Saturday, February 19, 2011

Lovely Afternoon

It was a nice mild winter day so I headed on over to pottery and spent about an hour sanding down my vase. Pretty much the same as last time, up and down and LOTS of dust. I wore a mask and glasses this time but I still managed to get covered in dust and had some get in my mouth and eyes a little. The breeze outside was helpful and not helpful at times >< Anyways, I'm still not done sanding. Next time I'll take a higher grade paper and re-do the whole thing again.


Remember this vase? Well it was its third time to the kiln and it FINALLY turned out somewhat decent. I actually like the color a lot. Unlike anything I've made so far. Very happy with the turn out, third time was the charm I guess. I'll enter this in the Imari Amateur pottery contest coming up in April. Ill probably title it "Blue Moon" since it reminds of exactly of that.


My dashi holders were doing pretty good. I took the newspaper and cardboard out and the handles were still in a good place. (Not like I could do much if they weren't haha, they're already dried in place)


They'll dry for another week or so and go in for bisque firing.


I still had another hour and a half so I took the rest of my Joshigaraki and made a few cups. I like to experiment with the wavy style so I did two of those and one regular shaped cup. I'll carve these next week.


Until next time!

Thursday, February 17, 2011

Coil Vase pt 6

Not too much happening with the vase lately. It's simply drying and awaiting firing. But while it's drying I have to important job of smoothing it out even more. It is at the perfect stage for a good sanding, let me rephrase that HAND sanding...There's really not too much to explain about it. Anyone who has done any sort of sanding before knows it's basically just a lot of rubbing back and forth.

But there is ONE thing to keep in mind while sanding a green ware vase, strokes are up and down, not random.


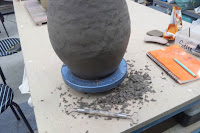
I made some initial marks here to show the color the vase will turn after sanding, a light gray. You can also see that even after carving away the larger lumps it's still not even close to being really smooth.


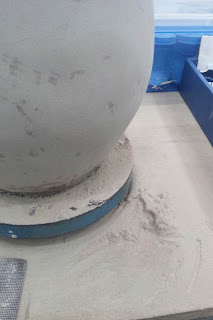
Here is the vase close up after a good sanding. See all the dust on the bottom? It's amazing how much came off actually. Next time I'm for sure wearing a mask and some eye ware. Inhaling this can't be healthy and I accidentally touched one of my eyes and it was irritated and itchy for a few hours after.

The initial sanding is with a lower grade paper (larger grain) once I have finished that I will use a higher grain paper to get a nice unscratched finished.


After about 45 min of sanding and a sore arm and shoulder later I decided to call it a day with sanding. I barely made it past the base, I still have about 2/3 of the vase to sand. Sanding isn't something that has to be rushed so I can slowly keep at it until it goes into the kiln. (Roughly 6 weeks to get the sanding done) Which is great since I was sore the next morning from using muscles in my arm I never usually use haha.


First firing


before second firing


awaiting third firing


On another note here is an older vase I made awhile back. The original color (top pic) is from the noborigama, not so great, would've liked more glaze runnage. The pink color was a second visit to the kiln with glaze X, but it didn't turn out well at all, (Sorry no picture) now far right picture is the vase again getting ready for it's third trip to the kiln. I hope the third times the charm. Glaze is Kohagi (bottom pic) Firing a pieces so many times isn't always a good idea, it could warp or break or look even worse than before. But I absolutely didn't like the vase after glaze X so I'm willing to take the risk.

Until next time!

Wednesday, February 16, 2011

Dashi Holders

Remember these guys from last time? Well it was time to add their handles.

I really liked the handle and look of this one from the studio. So I decided to model these two after it.


First I prepared the handle, a 5mm thick 5cm wide long stick of clay with a slit on one end. Since the clay was way to soft to stay afloat on its own I put it on a round bowl's underside which was about the same size as my dashi holder and let it dry for awhile.


In the mean time I put crumpled newspaper formed into a round ball inside the dashi holders. I made the newspaper ball a little taller than the height I wanted my handles falling at. Then I cut pieces of thin cardboard into two long strips (one for each piece) and placed them over the newspaper from spout to rear, as you can see to the left. (Sorry, slightly blurry picture)


I placed the clay on the cardboard and proceeded to cut slits on each end piece. (Three in total, two in front and one in back)


These slits will "grab" onto the dashi holder later with watery clay to make a strong seal.


After the handles were attached it was time to make sure they were straight and evenly curved.


The handles look ridiculously high but keep in mind they will droop down a certain amount so you always have to make them higher then you want them to be to get the perfect height in the end.

For now they will dry and await bisque firing :) I'll check on them again tomorrow to make sure the handles are still even.


Until next time!

Monday, February 14, 2011

A few in betweens

So while I'm waiting for other things to be finished I thought I'd go back to a few of my recent pieces and show you what's become of them.

First is the teapot from the last noborigama. It has a handle now (plasic sadly since I couldn't find a bamboo one to fit) and is currently in use almost everyday. I make mostly green tea with a removable screen to keep the leaves inside. I love this teapot, but the only downside is it does dribble, only a few drops though.


Next is the teapot turned vase. It looks much better with flowers in it and in a normal household setting. I bought a Japanese ikebana base, which is basically a piece of heavy iron with sharp nails sticking out. The flowers are held up with it. It's cool since you can make the flowers look like they're in a natural setting, not all bunched together into one group like a traditional bouquet.


Next is an old vase I made awhile back. Very small, only fits a few flowers. But it's small and cute, great for my bedside shelf.


Lunch at home on another old piece. One of my first few plates I made in the beginning. Melted blue glass and a simple square design. Menu was pan fried white fish with tumeric, paprika, red pepper and lemon juice, salad and homemade bread.


Moving on I also finished carving the two hot water/ dashi containers. Carving these took along time since I had to put them on a separate knob with clay while working the wheel so they wouldn't touch. The edges are curved so carving them directly on the wheel like other pieces would not work. (Another reason why anything other than bowls or cups is expensive in the ceramics world haha)
They turned out nice and are a good weight now. (way too heavy before) Left one has a bulls-eye design on the bottom, right is a normal smooth cut. I will attach handles to these tonight. Both are ultra white shigaraki clay.

Last but not least, a very cool yunomi. (teacup) A nice wavy design and a straight edge on the bottom. This one also took some extra time due to the odd shape, but I love how it turned out. Even my teacher said how cool it was, and he never says stuff like that haha. It's also ultra white shigaraki clay. It is drying and will be bisque fired next week. I have no idea what color I'll do yet...


Until next time!

Saturday, February 12, 2011

Coil Vase Pt. 6

A few days ago I finally finished building my coil vase.

This is where I left it, lumpy. So It was time to shave off those unsightly lumps!

The vase was left to dry with only towels (no plastic this time) so it was the perfect hardness for carving.


I took my carving tool and as with most things you start from the bottom and work to the top.

I used the flat side of the tool since you can see what areas are still uneven. As you see in the picture the lighter spots are where I carved higher lumps off, the darker spots are still untouched. The goal is to get an even surface, and it's easy to tell since the clay will all be one color.
Like usual I put the vase on a table wheel, but since it's so tall it's easy to knock over. Holding the base of the neck and carving away at a diagonal angle ensures it won't fall over and that the clay is coming off evenly. (Carving straight or from side to side could leave unevenness, diagonal gives the most control, and it's a heck of a lot faster!)


It is basically the same pattern from here on out, diagonal carving.

Here is the base finished.


two thirds finished


Just a little more.

This last part of the top was actually the most difficult. Holding the vase steady and carving the softer top was a little more tricky. My arms and shoulders were pretty sore after from standing on a stool and stooping over.


2 hours later and done! Looks MUCH different from the lumpy version. Nice polished finish.


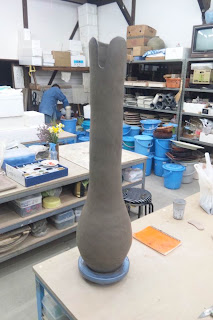
Here is a close up of the vase, nice and smooth.

The vase is still pretty thick even after shaving, which is a must since I plan to put big branches in it later on. So a good heavy base is in order.


The carving is done but the final touches are not. If you remember from my initial sketch, the mouth of the vase has a free form feel to it. So after lightly sketching with a felt marker the places I wanted to reduce, it was time to cut the excess away. I used a wire tool and steel cutter.


Here's after a few more cuts, still boxy and not very polished.


After some smoothing over it looks quite nice. Much more interesting than a normal boring vase.


Voila! It's "finished"!!!!!

It felt good to get this far.


So good I had to hug the vase out of pure joy :D


After another week of drying, it will get a green ware sanding down and dry for about 5-6 weeks before it can be bisque fired. More to come on it in mid-April!

Total hours so far= 15 hours
Total clay 10kilos-.75= 9.25 kilos


Until next time! With much happiness from Sara Yama Studio!

Wednesday, February 9, 2011

Coil Vase pt 5

The coil vase has finally been finished being built.

Here is where I left it last week, at 68cm.


And as usual I made coils and started building the final 22 cm.


The last 22cm was more difficult than I had anticipated. Since it was getting so tall it was harder and harder to build higher and higher. The stool I placed it on was too high, but I couldn't move it to the floor since I most likely wouldn't be able to lift it up again without risking breakage once it was finished.


All minor set backs.


Here it is at 82cm, just a little more!

It was hard to build it at this point, the vase is very wobbly from the moist clay and it is so tall that any slight movement makes it shaky.


88cm! Only two more coils.


90cm!!!! Done!

In the end the vase needed 10 kilos of clay, half of what my teacher predicted :D yay!

But the vase is not finished yet. It's still super lumpy so I need to carve the excess off to get a nice polished look. It's too wet now to do anything so as usual I wrapped it in towels and will get back to it this Thursday. I will also shape the mouth of the vase and cut some parts away like this.

So the calculated price of the vase so far,
*will change since it is not finished

13 hours of work X 1000 yen= 13000 yen
10 kilos of clay X 450 yen= 4500 yen

Total so far= 17500yen

More to come soon~

Friday, February 4, 2011

Coil Vase pt 4 and the Wheel


The days are finally starting to get longer so when I arrive at pottery in the evenings now there is still someday daylight to greet me :)


Here is the studio on Setsubun, February third. Setsubun is a Japanese tradition of chasing back luck out and good luck in.

Anyways,

I took out my coil vase again and started building as usual. Same process as before, make coils and build them on top, repeat.

Here is where I left the vase last time, 50cm.


58cm


62cm


68cm, this was as far as I could go last night. Like I said before I can only build 15-20cm at a time without the clay giving out. So I have about 20cm more before I'm done. I can't wait!

I'm up to 11 hours of work time and 8 kilos of clay.

The vase looks strange now, big on top etc but this will all be fixed later. I will carve off the lumps and such off after the piece has been built to 90cm.


I had another hour left so I used my remaining joshigaraki clay (上信楽) which was about 4 kilos to make a few things.

Two hot water holders and one cup.
The handles will be added next time.


This is a hot water teapot type thing that is in the studio that some one made awhile back. We use this thing for teatime and I absolutely love it. So I finally decided to make a few.


This is the larger of the two, but it will be smaller than the one in the studio, but not by too much. I figured it can be used for other things besides water, maybe sauce or dashi holder for sukiyaki and nabe cooking.


The second one is smaller than the first, so this one will be good for maybe serving milk or cream at breakfast or sauces.


Last was a cup, with waves on it. It'll be easy to hold and is a large size.


More to come next week!