Well I'm at it again with another big vase as my next project. I have only a few months left of having money, lots of free time and the chance to use the studio a lot so I'll take advantage of it and try to make as many statement pieces as I can. After I enter grad school in another city it will be hard to come back to the studio often, but well see :) I'll stay optimistic.
Anyways I bought about 18 kg of black stone clay 黒味影 くろみかげ kuromikage which is from Shiga prefecture near Kyoto city. It is one of my favorite clays to work with since it is one of the few clays that turns a nice ash black color after firing. It has lots of stones in it for texture and looks great with white glazes. It's a very earthy clay and is grainy because of the stones which can sometimes make it harder to work with on the wheel. With my 18kg I decided to make another giant vase since I'd like to start making pieces for a possible art exhibition in a few years. Also I love using vases in my home, and they are also great gifts for weddings or special occasions. You can never have too many giant vases :)
I briefly introduced my new vase in a previous post but thought I should show the start to finish process in general steps here.

Like my first large vase you must start from the base and work your way up building with coils. This time instead of making a thick base and carving out the bottom later on I made a thinner base that will dry as is.

After making coils its build build build. Here I am about 6 coils up.

In between building you must let the base somewhat harden before you can move on. Wet clay is wobbly and unstable, so letting it dry a bit for a few days ensures it won't topple as more and more weight is put on top.
Here is the vase at about 14 coils. Since it has reached the widest point in the design it is time to carve the excess clay from the bottom since once it is finished it won't be easy to flip it over and carve.

I used a bucket and a towel over it as a stabilizer and flipped it over. The bucket suspends the vase so I can carve the sides. As before, diagonal strokes downward with the carving tool gets the most even outcome.

After carving and a few more coils the vase looked like this. You can tell the bottom half is slightly smoother looking thanks to the carving. It was getting wobbly, so I let it be for a few days.

Here it is again after another 8 coils, the shape is really starting to form. Towards the top of the vase he clay is still pliable and soft, towards the bottom it is hard and sturdy but if I punched it, it would crumble.

The shape of the vase was slightly off at certain points so while the clay was still wet enough I used these tools to help make an even appearance. The far left round thing was used on the inside to get rid of sunken sections, the half moon scrapper was also used on the inside to smooth lumps and cracks over. The big paddle type things were used on the outside to pound sticking out parts in. I had to use these tools very gently in order to make sure I didn't crack or damage the vase.

After pounding and slapping, and a few more coils later the vase looked like this. It's hard to tell the difference from the previous picture but when turned the vase I could see a much more even shape than before. It's also important to pound out the waves int he vase from where I started up building after a few days break, you can see the line on the upper middle part of the vase.

Adding the last few coils before building is officially complete!

After 2 more I decided one last coil would make it complete.

Building done! Now to cut the rim and shape the walls...

Here is the rim after a quick trim with my wire cutter.

It was then time to knock away and smooth the vase to get a nice even shape.

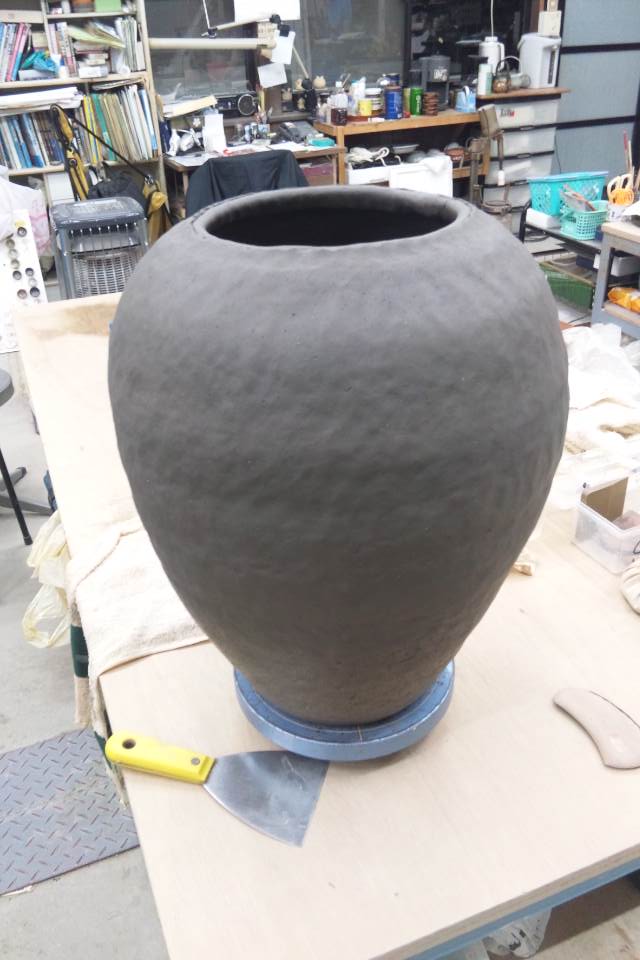
Here is the final shape! Now time to carve excess clay away...

I actually bought a new tool for the job, a large carving tool with rounded edges to not scratch the clay or leave dents on the side.

The top was still too soft to carve so I did the bottom part initially, I'll end up finishing the job next time after the clay has hardened a little.
So far I love the shape and can't wait to get to the next step! (carving out a design)

Before I start carving I drew out a primitive sketch of what I wanted the vase to look like. I wanted curvy lines that had an ocean wave look to them. The small circle sketch below is how I would go about making the lines coincide with one another from top to bottom.

Since the lines were not straight and the vase mouth and base were also different sizes I made two discs out of card board and drew 16 points equal lengths apart on each one.
This disc was for the base.

This one for the mouth. After placing the dics on and under the vase I took a marker and made dashes at each line on the vase.

I then drew lines free hand from top to bottom.

It's hard to tell in this picture but I have finished all the lines. It was difficult to keep them uniform so some spots are wider than others, it's not perfect but I like how it turned out in the end anyways :)

I wanted a "mountain" effect so the lines I just drew were a guide. The lines would be the highest points on the vase while the middle of the lines the lowest.
Here I am starting on my third line. As you can see I used a carving tool to start the deepest point in between.

Here is a close up.

There were 16 lines total, here I am about half way. I kept a towel around the parts I wasn't working on to keep the clay moist. Since this was black stone clay it dried out quickly and constantly needed to be sprayed with water.
Interesting fact: Black stone is the most expensive clay available at Sara Yama Studio, but since everyone orders all different types of clays at various prices Arai Sensei is able to keep them all at one price.

Just a few more lines!

Just about done! The hardest and most tiring part is complete, now it's time for the tedious work.
The lines were too round for my taste, I wanted a more crisp precise look so from now I'll go through all the lines again and make the ridges sharp.

I bought another new carving tool ( left) and used one of my older ones to form the sharp ridges. They are both square, which makes it much easier and faster to get the effect I wanted.

Here I am half way. I tried to take a picture to show the difference between the rounded ridges and sharp ones. The left side is sharp and the right side hasn't been done yet. It's only a slight difference but overall the piece looks much more polished. The glaze will also look better on defined ridges, hopefully resulting in a nice contrast at high and low points.

Here is the final product!!! After almost 30 hours of work it is ready to dry and be fired in about 2 months! I'll glaze it probably right before I head back to the states. I really hope it turns out well!

A view from above

For now it has been wrapped in a towel for drying.
Until next time!
 May 28th and 29th was the Sara Yama Festival which is a small festival held by the town of Saza. There's various booths selling things, lots of food and events for kids. Every year the the studio has a booth selling pieces we've made and a booth for kids and adults to paint their own plate (for free!)
 Here is the booth selling various things students have made. There were hundres of different things from cups to plates to figurines to necklaces with clay beads. Sadly I didn't put anything to sell this year since I didn't have anything worth selling.
 Here is the paint your own plate booth. Mostly kids do it but we had a few parents and adults paint their own plate as well.
 The constant drizzle kept all of us under the tent so it was quite crowded!
 Anyways, since my large vase is drying I'm back to making regular things. Here I made 6 cups and plates, mix of red stone and black stone clay. Very gritty, but the stones look great after firing.
 Here are three of them after carving. Because the clay is so gritty it is hard to make them thin and light but I did pretty well this time, except one cup which I will do over sometime.
 Another plate, turned out well.
 One handled coffee/tea cup
 Underside of the two