Monday, November 29, 2010

Latelies


It's been another sporadic week at Sara Yama Studios, dentist appointments and national holidays threw my usual days at the studio off. Arai Sensei also had an exhibition of his work at his studio. So he was pretty busy with that up until lately so most of the pieces I made awhile back haven't come out of the kiln until now. Since it is also the end of November the fall colors around the studio are amazing. Here is a shot from the river flowing through the back area of the studio. The yellow ginko tree looks quite lovely now :)


First were some coffee cups I made awhile back that were back from bisque firing. These are a mix of clays but are mostly red stone clay.


The cup in the middle (which I forgot to take a picture of was U, kiseto and is going into the December noborigama)


The base glaze for this one was E, or tetsu aka a very nice red glaze with brown and gold undertones. On the cups tip I did U or kiseto, a mild yellow color. I've never done this combo before so it'll be interesting to see how they turn out.


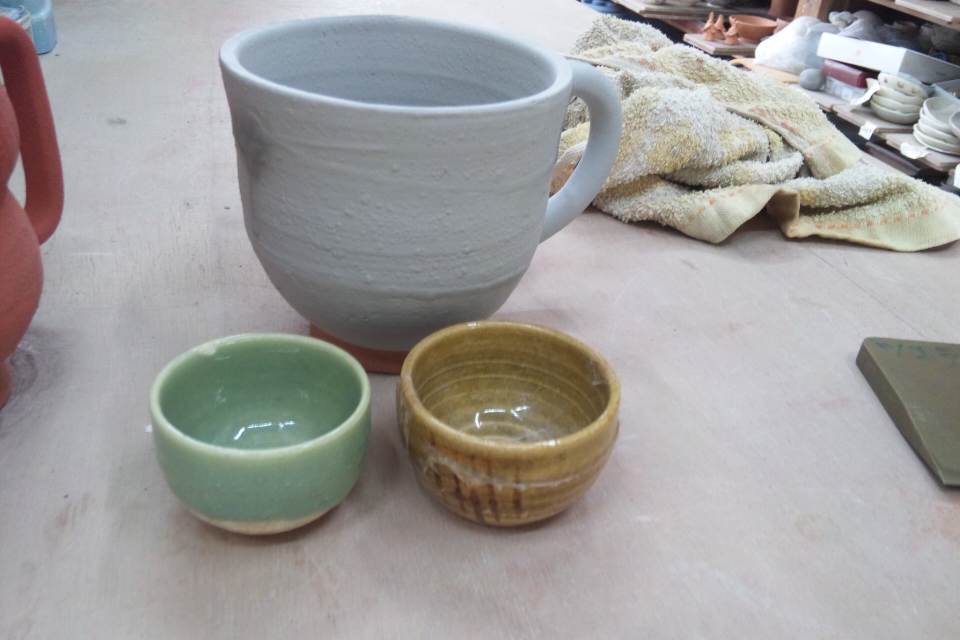
Last cup I did a swirl design of U under a full top glaze of L or shinsha.


****Correction****

Back on my colors blog I used the wrong glaze for U or kiseto. The glaze that is pictured here is actually glaze N NOT glaze U. The real color of Glaze U is a mild mustard yellow. Sorry for the confusion. I'll fix the color blog entry soon.


Next were two bowls, black stone clay. I used R or Kohagi glaze on these and they will also go into the noborigama in a few weeks.


Last were the mixed clay plates I made a few weeks ago with all my leftovers.


These will go into the noborigama, but I didn't want to cover the cool clay swirls with a thick glaze, so I brought out the air gun again :)


I did a light glaze of L, E and U. I'm hoping the results will be a wonderful but defined blend of the three. I tried to keep each color on one third of the plate, but since the noborigama's heat is unpredictable I won't know how they'll turn out until I see them.


Until next time!

Wednesday, November 17, 2010

Slow Day

It was a slow night at Sara Yama Studio. I had no new bisque fired pieces to glaze and only two bowls to finished shaving. I also had one bowl/cup from last week that I attached a handle to. (far right) All three pieces turned out well, they are currently drying and awaiting bisque firing. I used black stone clay, most likely I'll put these in the nobori and use kohagi glaze. Other than these bowls it was a night for catching up on things and organizing my clay.


Making things on the wheel and shaving pieces down leaves you with odd amounts of clay here and there. So the best (and most fun) thing to do is mix all the old bits of clay together to create a workable amount of clay. And that is exactly what I did last night. I had about 1 kilo leftover from these plates ( mix of bizen, black stone, red stone and possibly a tad of white shigaraki) a few scraps of red shigaraki, and a half kilos worth of red stone shigaraki mixed with bizen. All these different clay scraps were at different moisture levels so it was hard to knead them together. Instead I kneaded them separately, and smooshed them together afterward. I then placed the 2-3 kilo mass into a plastic bag and misted it with water. Letting it sit for a few days will help the moisture even out and make the mass easier to knead next time.

The only bummer about this batch of mixed clay is since I added red shigaraki (which has a high iron content, making it easy to explode) I shouldn't put it in the noborigama. There is still a possibility I could add it, but I would have to knead the clay very well to make sure its distributed evenly making the risk of cracking low. I still have to discuss the details with Arai Sensei, since it is a small amount maybe I'm worrying too much.

After finally getting rid of all those small pieces of clay I finally got to open a new bag of clay I bought over 2 months ago. Jo shigaraki 上信楽, or snow white shigaraki as I like to call it. I have seen other students use this clay before, once it is fired it turns a pure white color and has an extremely smooth texture. (Pictures of fired pieces to come next time) I had always wanted to try this clay but always missed my chance when Arai Sensei made his order, last time I was on top of my game and finally got my hands on 6 kilos.


I had been waiting for a slow night to give this new clay a go. I took about 2.5 kilos from the mass, started kneading and IMMEDIATELY noticed a huge difference from other clays. It was like kneading melted butter! Effortless, easy and smooth. I could even use my (still) injured wrist like normal without pain. It was love at first touch :)


After a few minutes of kneading, the clay turned a light gray color and was ready for the wheel. The wheel was even more luxurious than I thought it would be. Compared to all the other clays I've worked with, this felt like silk running through my hands and fingers. No numbness from stones or gritty sand. No cuts and scratches. No arm pain from trying to center the clay.
There had to be a catch, I stopped the wheel and went to console with Arai Sensei. He warned me that since this clay is so smooth is topples very easily and is not as stable as other clays with more sand and stones.

"Is that it? No other catch?"
"Nope, that's about it, the clay is strong like all other clays when fired so you can make anything you like." he said.
So I went back to the wheel and discovered another downside...Jo Shigaraki clay is easy to get air bubbles...Although kneading was a breeze, I didn't know until I started making a cup that there were tons of air bubbles in the clay. At first I thought it was just a fluke but the next cup had the same problem...I managed to pop most of them but it left me worried that there were bubbles I missed. If there are air bubbles in a piece, they will end up exploding in the kiln. Sometimes severely (The whole thing breaking) and sometimes not so much. (just some cracks) Of course this wasn't the clays fault, it was my kneading technique (which I am still not a master of) So next time I knead Jo Shigaraki I will have to be extra cautious. I scrapped the cups and called it a night.

I'll be back to the studio again tonight to try at it again :) Until next post!

From Sara Yama

Saturday, November 13, 2010

It's Finally Fall!

The surrounding park around Sara Yama is finally starting to change colors. Here is a ginkgo tree near the public restrooms. The picture doesn't do it justice but the tree is a magnificent yellow green color! I'm sure by next weekend it'll be glowing yellow. Kyushu doesn't have as spectacular color change as northern Japan does but there are patches of red and yellow on the mostly green mountain sides :)

I spent most of my Saturday afternoon catching up on work at the studio since I am still behind from summer vacation.


Anyways! Here's what's been going on lately :)


It is already the middle of November and that means the next noborigama is only a month away! So it is time to start thinking about what I want to put in this time around. Last September I did not plan well and wished I had more pieces to put in, but I think this time I'll have too many to count! Adding to a large vase (remember this thing! I almost forgot about it) and my recent teapot. Now I also have 6 mixed clay plates to add. They are about 4mm thick and about a hands width wide. (Of course they will shrink slightly after firing) I mixed bizen, black stone, red stone and possibly a tad of white shigaraki. These were just free form made plates, and are currently drying/ waiting for bisque firing.


The key to getting a nice swirl like this is mixing the clays while they're very soft, and not kneading too much. The more you knead, the more the clay will blend together and the less each color will stand out.

I'm sure these will turn out great in the noborigama. The mix of clays will for sure make a great color. I haven't decided if I'll give some a slight glaze or not, since nobori pieces look best without glaze since the wood brings out great color. Nobori pieces also don't need a glaze to be used with food. The high temp and long firing time makes the clay strong enough to be used as a normal glazed plate.


Next a drink set I made awhile back has been bisque fired.


Bizen clay, with a swirl design of L on the side (top rust colored tea cup sample) and a top color of I.(bottom whitish tea cup sample) These will be RF fired. Can't wait to see how they turn out!


I also got around to my night lamp. I spray glazed it with M, OF firing.


This is glaze M in the daylight. Great darker brown with yellow undertones. I sprayed it since it needed a very thin layer of glaze. Dipping this piece would clog the holes where the light should come out of. Should turn out well with this light glaze. Hopefully I can find a tiny light bulb and cord to fit with it.


I also finished some coffee cups I made last Thursday night. I shaved and attached handles to them today. These are another mix clay batch, but are mostly red stone clay.

I have many mixed pieces since I am trying to use up all my leftover clay. And actually the mixed clay pieces usually turn out much cooler than the one clay pieces. Arai Sensei actually has his own mix of clay he uses.


Last piece of the day. A huge black stone clay coffee/soup cup. The handle was still too squishy to apply so I'll do that next week Tuesday.


Until next time! From Sara Yama :)

Thursday, November 11, 2010

Loading the Kiln and Bowls

It has been a busy fall at Sara Yama Studios for Arai Sensei so firings have been a little behind schedule. Last week I had some free time at the end of class so I watched (and helped where I could) with loading the kiln for a bisque firing.

Here is the kiln half full, as you can see everything must be sized to fit on certain shelves. The height of the blocks between each rock sheet determines the height of each level.

There are large pieces on top of the kiln that are drying, the heat in this room helps take out the final moisture before firing.


Short pieces are on the bottom and tall pieces towards the top. Arai Sensei is a pro at putting in as many pieces as possible. He said this type of thing would be great for people who like puzzles haha.


Here is the kiln all loaded and ready. There are at least 150 pieces crammed in. One thing I did not know was that for bisque firing it is OK if pieces are touching each other. (Obviously glazed pieces cannot since they will melt together) The only thing the pieces cannot touch is the wall of the kiln.

This batch is ready for firing. Since it is an electric kiln all Arai Sensei has to do is turn it to the right program and push the start button, everything else is automated. About 30 hours later the kiln has cooled off and is ready to be unloaded.

Interesting fact: The monthly kiln electricity bill is about 70,000 yen! (about $750) So on average each firing costs about 10,000 yen! ($112!) Luckily the town helps cover the fees, making Sara Yama one of the cheapest places to learn pottery in Kyushu. I've checked other studios in and around Fukuoka city (Biggest city in Kyushu) and the prices are much higher for everything! About 1500yen for 1 kilo of clay compared to Sara Yama's 450yen. Also the Fukuoka studios charge by the gram for firings. (About 2.5 yen per gram) YIKES!


Anyways, here are three bowls I have made recently out of kuromikage or black stone clay. They are currently waiting to be shaved at the bottom.


Over view of the bowls.


After loading the kiln we had cream cheese salmon roe crackers! One of the older ladies brought some very good roe and I brought the cream cheese and crackers (which none of them had tried before!) It was a hit :) Oishikatta!

Until next time!


Wednesday, November 10, 2010

I can finally move on!

After a long 6 weeks, I am finally done with the teapot. I had a few mishaps along the way...lid not fitting, my teacher (Left photo) had to fix the spout for me since I cracked it etc...But all the hard work has paid off! Here are the final steps! (mishaps included)


After starting to carve the teapot spout (which was extremely fragile and brittle) I accidentally cracked it. But never fear! Arai Sensei was there! After getting all panicked my teacher came over and calmly fixed the crack.


Here he is taking some of the leftover bizen clay and mending the crack. He used water, a carving knife and a brush. First dipping the brush in the water he lightly brushed the crack. This filled it with a very small amount water which made the bonding of both sides much easier. He then took some bizen clay (about a a 10yen coin size worth) and started molding back the areas that had crumbled away. It's hard to tell in this picture but he is moving the blade towards the body, not away from it. (I did the opposite which led to the crack in the first place) Going towards the body provides more support for the spout and lessens the chance of cracks or unwanted large pieces breaking off.

Since the water from the brush needs to soak in overnight I couldn't carve the teapot anymore than night. So I put it away and came back to it the next week.


The next class, it was time to carve the spout for the final time and attach the handle rings to the teapot body. Before attaching the rings it is important to finish carving since it can be difficult with the rings. They could get knocked off or bent.


After gingerly carving the spout it was time to attach the rings. I first eye measure where I wanted the rings placed and scored the bonding spots on both the teapot body and rings. I then used a liquefied form of the bizen clay and a brush to ensure a good seal. Although the teapot and rings were much drier than the liquid clay, Arai Sensei insured me that the bond would be very strong since the moisture would serve as a sealing agent.


Moving quickly I attached the rings to the front and back. I also checked above and around to make sure the rings were at the level and angle I wanted.


After the rings were attached the area around them was lumpy and ugly so I took some of the liquid clay and brush it around to make a nice smooth surface. (I used my fingers and some water too) Some may think the spout is rather long but this is actually a must since the tip of the spout has to coincide with the water level inside the pot. If the spout mouth is too low the water will leak out.


Voila! A complete teapot!!! ALMOST! I thought the teapot needed a little extra design element so I added some warts (as one of my fellow students called them) to the outside.

As you may remember I have done this one other time on a small plate. It turned out really well and would love to see the same for the teapot. Although they may look like warts to some, I think it looks cool :)


The final touch was a small 2mm ball on the underside of the spout tip. I was worried about the spout dribbling (since it is very hard to make a smooth pouring spout) So my teacher said putting this small ball on the underside will help catch the water and prevent it from dribbling down the side. Hope it works!


In the meantime the teapot will dry and get bisque fired, glazed and will be put into the winter (dec 18th) noborigama. So actually I won't get to see it until 2011!

Until next time!!!

Wednesday, November 3, 2010

Glass plates

It has been quite awhile since I have had any new pieces come out of the kiln, so this past firing many new things (that I've been anxiously waiting for) came out! Everything turned out wonderful this time, couldn't be happier!

First and most importantly are the glass plates I made awhile back! Here is my favorite piece, which turned out EXACTLY how I wished it would :) Like I predicted the glass stayed within the carved areas and created a beautiful image of a Japanese flower called higanbana, which only comes out in early fall. I would have liked the glass to be red, but actually the blue has grown on me, it looks good with the green glaze and pops really well.


Here is a close up of the glass. You can see small melting cracks, which add character and interest. I personally love the glass look!

This plate was white stone shigaraki clay with blue glass and a sprayed on glaze of U and J. OF firing.


Next was another glass plate with a leaf motif. Bizen clay with U glaze and green glass, OF firing. (which melts the glass better than RF firing)


Close up, the glass spread a little beyond the leaves but it still looks nice :)


Last of thie plate series is the bubble glass plate. Bizen clay with U glaze and dark blue glass, OF firing. I also love how this one turned out as well.


Close up of the glass


Besides the plates I also had quite a few cups and a few small bowls.
Here are two bizen cups with glaze K . The color is great, I'll def try this combo again. RF firing.


The bizen clay and K glaze gave a nice green color with some light blue drip lines.


Next, two more bizen clay cups with I glaze and M glaze design brushed on. It was my first time using I and it turned out quite nicely. I love the mild blue/green color.


Bird eye view shot, left cup is a swirl design, right cup line and spot design.


Close up, loved this design, will paint it again. Has a delicate handle and wide mouth, great for tea.


Delicate swirl design, another good wide tea cup and a slightly larger flat handle.


Last but not least, two white stone shigaraki clays, left R glaze and right S glaze (another new glaze to me) RF firing.


It will be awhile until I have some completed pieces again. The teapot is still under way and a bunch of new cups are currently drying and waiting for bisque firing. More to come next week!

Check out Oct 19th's blog to see all these pieces before firing
http://overasiaandbackagain.blogspot.com/2010/10/break-from-tp.html