
The teapot was ready and waiting for me at Sara Yama Studio. I knew I would spend most of my three hours in headache inducing work so I had my i-pod ready at hand.
It was time to attach the spout to the teapot body, the most time consuming and "technical" part of the whole process. Since this was only my second time doing this type of work Arai Sensei guided me through the whole process which I will explain in detail below. (Pictures included! yay!)

1. Aligning the teapot body and spout is very important, if the degree the spout is attached to the body doesn't coincide with the top opening the water could dribble out. Here Arai Sensei is showing me how to eye up the correct positioning. It isn't too technical, more eyeballing it. Looking at the teapot at eye level Arai Sensei placed the spout at the correct angle. While keeping it at that same spot he then looked at the spout from above to make sure it was straight. My spout was slightly shifted to the left so he shifted it slightly to the left to adjust my mistake. He then took a marker and roughly outlined the silhouette onto the spout and drew a line on the top of the spout running to the teapot body. He did this so we could easily see where we aligned it later on. This process is one of the most important since you decide how you want the spout to look on your teapot. Best to make sure you like the placement before you move on!
 2. Time to start carving the spout! Starting with the base Arai Sensei started the hole for me. We used a carving tool which has a similar blade as a box cutter, but double edged and with a wooden handle.
 3. Here you can see the lines he drew from step one. The base has been carved out so it is time to carve away below the curved line.
 4. Slowly but surely more and more and the spout is disappearing. Keep carving!
 5. The whole point of carving the spout in this manner is to coincide the body's curve with the spout to ensure a tight fit when they are finally attached to each other. Here you can see I still have a long way to go before they fit correctly.
 6. Keep carving...As you can see, the closer I get to the line the thinner the clay wall is, so I had to be careful to put push too hard and break then entire spout.
 7. Just about there... It is important to carve away inside the spout as well. It will insure a good tight fit and make the spout lighter, which is also a plus. No one wants a super heavy teapot!
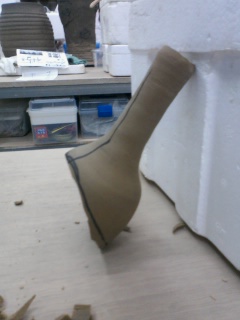 8. Have to make sure the sides are even as well. Mind you, while I was doing this I kept checking how the spout fit at the same spot the line was made on the teapot body. The last carving is always the most difficult, very tedious. If you scrape away too much on one side you have to adjust the whole thing again, which means the spout gets shorter and shorter. Best to carve it slowly and carefully.
 9. IMPORTANT STEP After about an hour of carving the spout (Yes, an hour!) It was time to draw the hole onto the teapot body. While aligning the spout with the line drawn from step one, and making sure the position of the spout looks even on all sides, it was time to outline the spout onto the teapot body. A marker works just fine, and not to worry about the lines, they'll burn off during bisque firing. After the outline is drawn another line about 1 cm smaller parallel is drawn inside. The inside of this oval is what is to be carved out. The reason is the spout thickness has to be taken into account, if I carved all the way to the spout outline the spout wouldn't fit onto the body, the hole would be too big. 1 cm leeway can be too much at certain spots so I carefully carved slightly more off while making sure the spout still fit correctly.
 10. Once the perfect fit is found, it's time to attach them to together. I needed to score each piece to ensure a good bond. You can see the scratches in the photo.
 11. A ready made clay paste is the best sealant for green ware. Get the brush nice and full of the clay paste and paint around the spout edge.
 12. Softly attached them together, aligning the line from step one.
 13. Check from above, below, side etc to make sure it looks good. Then push the spout and body tightly using two hands to ensure they are fully sealed together.
 14. I like to paint the sealed area on the outside with the clay paste and then smooth the rough edges out. The moisture from the paste is the perfect consistency to get a great finish.
 15. After the outside is smoothed out, it's time to smooth the inside of the teapot. This can be difficult, esp. if the top hole is too small to allow your hand or fingers inside. Mine was barely big enough so I could smooth the edges out very well. I also painted inside with the clay paste and added a little more wet clay to get a nice smooth inside spout. You'll be thankful later for doing this since cleaning old tea leaves or stains out later could prove to be difficult.
 16. Next it was time to move on to the lid. As you can see above, the lid was too wide for the teapot so I decided it needed to be trimmed down.
 17. Looking at it from above I drew a dot to show how far in I wanted it taken in. Time to move to the potter's wheel.
 18. Since the lid was carved the previous time, it was too thin and delicate to carve normally. So Arai Sensei showed me how to get around this problem. Make a ring of clay in the middle to fit with the groove on the underside of the lid. After the ring is centered on the wheel the lid can easily be placed on top.
 19. After centering the lid, I lightly pushed down on it to hopefully get it to stay in the same spot. While turning the wheel, I took the marker and drew a circle coinciding with the spot I drew from step 17. I want to carve up to this line. After carving up to the line I placed it on the teapot and decided to needed to take more off, it was still too straight. Carving with the ring of clay was extremely difficult. There is no clay around the edge so when I push on one side it moves the entire lid making it off balance. I had to very very gently carve away at it, and it did move at least 10 times before I finished. When it moved I had to stop, realign it and start again.
 20. Last a small steam hole is made on the top. Looks good right? Nice fitting lid :)
 21. WRONG! I made the mistake of not checking the SIDE of the lid while carving...I ended up carving too much on the side leaving a slight gap...darn! (You can slightly see it in this picture) Bad news is I have to make a new lid if I want it to fit correctly. Good news: I wanted a more round lid so making a new one is probably a better idea anyways.
Next time I will carve the spout and add rings for a handle to be attached after glazing. I'm up to 7 hours of time on the teapot, and it's not even close to being finished.
 On a side note I have finished the small globe lantern. I punched holes in an interesting design and left a larger hole for a lightbulb cord. It's currently drying and will soon be bisque fired :) I'm excited to see if I can really make a lamp out of this :)
Until next time!
Hope the lamp turns out...neat idea.
ReplyDelete