Friday, April 15, 2011

Vases

Like I've mentioned before my big vase has been bisque fired and is ready for glazing. I took it outside for a final sanding and air gun blast before starting the glaze work.

I originally wanted an all white vase, which was hard to visualize before bisque firing since it was a gray color. But now that it has been fired it turned into a nice white color. After starting at it for a few minutes I changed my mind and scrapped the all white idea, concluding it was too boring and I would regret the choice.

So I went over to the color choices and decided on three colors I like and use a lot. I also decided to use my typical design of lines and dots which are a theme in some of my other pieces.


An initial sketch showing my design with my color choices. I decided the lines and dots would be the iron red base with glaze E as an accent. The overall color would be U, a favorite yellow glaze I use quite often.


I first drew lines with a pen as a guide before painting the red iron. (The pen will burn off during firing)


I then painted each line on carefully. I used two calligraphy brushes. A normal size and a small detail size.

The glaze went on pretty well but the clay sucks up the color quite fast so I had to re-dip the brush a lot.


After drawing the lines I used the pen again and drew the dots. I used the detail brush to fill in the red iron color.


I didn't want just lines, but a gradation from dark at the bottom to the yellow at the top. So I took a large painting brush and filled in the bottom with wispy brush strokes of red iron.


Last I used glaze E over the red iron to create hopefully more depth and interest at the bottom.


Voila! Hand painted and ready for the top coat. By the time I finished painting the design it was dark outside so I'll spray glaze U over the top this coming Sunday. I hope it turns out well!


I've gotten bored with cups and plates so I've decided to continue making large vases for the time being with maybe a few small pieces on the side.

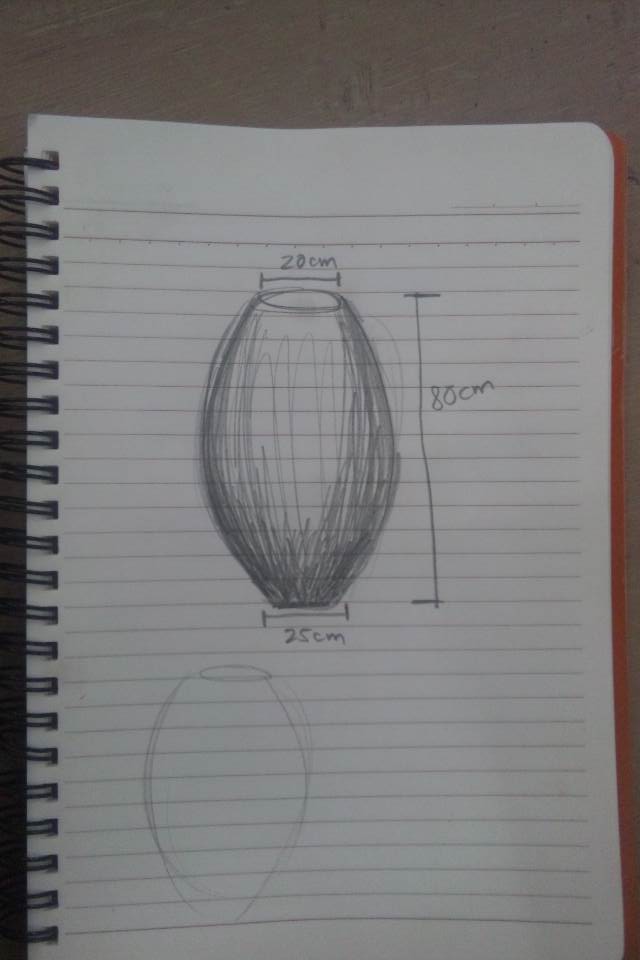
This is the sketch of my next project which I've already started on.


I'm using black stone clay and hope for a height of around 70-80cm, but there is one slight set back. I only have 10kilos of clay and I will most likely need more than that to build something this wide and tall. Luckily Arai Sensei is ordering more clay next week, but sadly it won't arrive for another 2-3weeks so I may have to hold off once I run out of clay.

In the meantime here is the vase so far, I've built a few more coils on top of this so it is about 7cm higher now than the picture shows. I'll continue building on it next week.


Until Next time!

Wednesday, April 13, 2011

Imari Amateur Ceremics Contest

From April 1st to the 10th was the Imari International Amateur Ceramics Contest. I was lucky enough to receive an outstanding achievement award for my "Blue Moon" vase. I was so happy and shocked by the news! I had lots of trouble with this vase but it all paid off in the end. This is my first recognition for my pottery in Japan! There was an awards ceremony and a photo session to celebrate the occasion.

Here I am receiving a plaque and gift from the mayor of Imari City.
Certificate and gift, an Imari porcelain bowl


A group shot of all the winners and judges!
A few pictures of me and the judges, who are from the famous ceramic families of Imari.


The ceremony and pieces were on display here in Okawachi area in Imari City.


A total of 77 adults entered the competition and over 400 children entered the youth division. Here is the room where the pieces were on display.


Here is a shot of some of the adult pieces. As you can see most of the pieces are large vases, mine looks tiny compared to the others.


Here are the top three grand prize winners. The middle is first place, a woman from Sasebo. Second place is on the right and third place is on the left. All the top winners were 50 years old or more.


Here is another outstanding achievement award. It was given to another lady at Sara Yama Studio! I remember her making this piece and it was cool to see how it turned out :) It has a cord next to it so I'm assuming she will use it as a lamp.


Here are some of the other outstanding achievement winners.


These were two of my personal favs. I loved the cherry blossom vase and the lovely hand painted plate next to it.


The kids pieces were in the middle of the room. It was so fun to see all the cute animals and creatures on display. Here are some pieces that appear to be monster themed.


The adult pieces are amazing but it's more fun to look at the creative kids pieces. Here is one titled "Bunny" hehe


Here are a few turtles.


And my personal fav. an octopus! So cute!


These are pieces from the pottery club at one of the elementary schools I teach at. Of course Arai Sensei is the head of the club.


Of course the kids section had winners as well. Here are the grand prize winners.


A shot of the kids section winners and judges.

Finally, me and my vase. What a great experience! I'm so sad my time in Nagasaki is slowly coming to an end, but I will for sure continue with my pottery and develop my style and skills. Thank you Arai Sensei! I couldn't have made it this far without you!!!


For those of you who aren't familiar with Imari ware I'll give a brief description of it. Historically Imari city was a port of trade for European exports, one of the main exports being Arita porcelain. (Arita is a town next to Imari which is know for Arita-yaki, and has a long ceramics history) The main types of ware exported were porcelain ware white in base and hand painted with intricate flowers, china themes, designs etc. The main colors are blue and red, but aren't limited to only these two colors. Eventually kilns started forming in Imari as well and Imari developed its own style and designs, mainly the Imari style and Kakiemon family style. The Imari and Arita area are very unique since they have outside influence from Korea, China and Europe. It is definitely a must see place for pottery fans. This is a very brief account of Imari so I urge you to do some research yourself to found out more about this wonderful pottery town. (Picture is a porcelain tile map of the kilns in Imari)
Imari is a great day trip. There are lot's of small shops to stop at and maybe buy a souvenir.


The Okawachi area has a lot of charm as well. There is a beautiful stream flowing through the town and the bridges are decorated in broken porcelain pieces. Sometimes you can even see koi swimming in the river.


Spring is also a great time to go. The cherry blossoms are in bloom and the days are nice and warm.


Next Post: Spring Noborigama

Until next time!

Monday, April 11, 2011

Not Much

It's getting warmer and warmer here in Japan and the sakura trees are in full bloom now! Here is a pic of some of the trees near the studio. The trees go up onto the side of the mountain as well. Almost makes the mountain look like it has patches of snow on it.
Anyways, only a few things this post. Here is a plate waiting for bisque firing I finished up carving the other night. I made 2 other cups along with it but ended up trashing them since they just didn't turn out well. This one is still mediocre but it'll be a good plate to use at home since I don't have many this shape and size.


I did a pretty good job carving it. Since red stone clay is the most rough and grainy it can be really hard to carve. Stones end up getting in the way and this clay wears tools out very quickly. it's best to carve red stone clay soon after making it (within a few days) other wise the clay gets hard and difficult to manage. I didn't get around to this one until a week later and it was pretty hard. It took twice as long to carve and I couldn't take as much off the bottom as I had hoped for fear of cracking it. It's a little heavy but sometimes that's good for plates ;)

This past weekend the local English teachers had a fundraiser for the Tohoku earthquake. I couldn't make it due to an event in Imari (more on that next post) so I donated some of my work to the cause. Just a few plates or cups like the ones pictured there. I was hoping to give some better pieces (maybe coffee/tea cups) but my transferring teachers cleared me out a few weeks before. (These were given away as prizes.)


Last, here are some vases my teacher made. I just wanted to post them so you can see the differences between a beginner and a pro. His vases are amazing and they only take him a few minutes to make on the wheel. These four went into the noborigama that took place this past Saturday. A post about that to follow next week after the pieces come out of the kiln.


Until next time!

Monday, April 4, 2011

Forgotten Things

Yummmm, breakfast I made on dishes I made. Nothing better than that!

Anyways, this post is mostly things I forgot to post the final version of. So I'll start from the oldest.

First is this small vase I made a few months back in this batch of pieces. I forgot to take photos of the two cups since I gave them away as presents, but the color looks pretty much the same. Bizen clay with X glaze and brush strokes of an iron based red color and undertones of a white glaze called kaorin.


Next is one of two pencil holders. Glaze C on bottom and Glaze Z on the top. Joshigaraki clay. RF firing


The other pencil holder, Glaze L on bottom with glaze E on top. Joshigaraki clay. OF firing


Last is a cup I made. Glaze I with accent glaze Z on the handle. Joshigaraki clay, RF firing.


Here is a close up of the glaze, as time passes the glaze cracks and you get this great accent. I love lighter glaze colors with white clay since you can see the cracking. It's a nice effect. Depending on the clay and glaze combo this doesn't always happen.


Here is a green ware bowl that I carved recently. Its bizen clay. I decided to try something new. I put a slip of kaorin (a white mate glaze) on the inside and outside.


I did two coats to make sure I get a nice white effect. Once this is bisque fired I'll either do a clear glaze or a light colored glaze over. The white will basically remain how it is.


I also did this design on the side. I've seen this around on other pottery and I liked it a lot. It looks complicated but it's actually relatively easy. Refer to this blog entry on how it's done. To get this effect, put the slip on and let dry, then chip away. The white glaze won't run so the jagged marks will stay as is. I was hoping to get this into the noborigama, but it won't dry in time. Oh well. Either way, I'm excited to see how this turns out.


Lastly, three new pieces I made on the wheel with a clay I haven't worked with in quite awhile, red stone clay. It's extremely grainy and rocky so it hurt my hands but once I get back into the swing of using it I'll get better. These turned out so so, but I decided to wait and see how they dry before I keep or trash them.

Until next time!