Wednesday, June 16, 2010

My New Favorite Clay...

The red rough clay from Shigaraki prefecture (red #104) is slowly growing to be my favorite clay to use. The wonderful rich red color and gold like stones and sand inside create wonderful pieces and add interest to any glaze that's used on it. Look at some examples below...

***Click on images for larger view


In this small plate series you can see how the red clay makes the green glaze much more appealing and gives it great texture. The gold stones inside this clay melt with the glaze and create new color. The result is a very earthy and visually pleasing. I personally love it.
Below you can see how the glaze looks with a normal red clay from Shigaraki prefecture. This clay is the smooth version of red #104, very similar color but minus the stones. The results are quite different.


Below are some other red#104 clay plates with different glazes. Look closely at all the different colors. With some of the thicker glazes the stones don't stand out as much.

Like I wrote in my past post, I am making clay and glaze samples. When those are complete you will really be able to tell what a difference each clay makes with each glaze. In the meantime I hope this helps!

Back in Action!


Well I'm finally over my bronchitis and back in the studio! Feels great to be back! Since I was away, many of my pieces I've been waiting for have been fired, and 10 pieces in particular are my test tiles I made awhile back. I have been waiting for these babies for almost two months and...drum roll please!...They look amazing! I absolutely love the color and the way they turned out. The wait was worth it. In the year I have been at Sara Yama I must admit these tiles are the best pieces I've turned out. (or at least I think so)

***Click on the tiles to get larger photos


The clays I used were a mix of left over Bizen and Shigaraki (white) clay. The result was a smooth soft pink color and texture. I made 3mm and 5mm pieces and the 5mm turned out much better than the 3mm. At the time it should have been obvious but the 3mm tiles were too thin and ended up warping a little during the glaze firing. (but not enough to make them unusable) The backs of the tiles have grooves in them just like commercial tiles so all the pieces are very much so usable. (Tiles need the grooves on the back so the grout will help seal it to the wall or floor)


In total I used five different glaze colors. The colors were applied using an air gun, so that's why there's the speckled effect on some of the tiles. I also etched my own designs into the tiles while they were still somewhat wet. I wasn't sure how the designs would turn out, but I like the texture they give and the depth of field. They're also eye catching which is never a minus.

Besides 3mm being too thin and causing slight warping, I found out the white/bluish glazes I used also tend to warp clay when only used on one side of a piece. Next time I will either use sparse amounts of the white or avoid it all together.

Overall I an extremely happy with all the tiles! I can't wait to make more and use them in my future bathroom or kitchen. They'd look great as a counter tile, bathtub border or even on a table top. I'll use these 10 test tiles as a wall decoration in my room. Most likely I'll use a frame, smear on some grout and attach the tiles to it. Pictures to come once it's completed!

Thursday, June 10, 2010

Sick

Hello all, I've been sick with bronchitis for a few weeks now...I'll write again when I'm back in the studio next week!

Thursday, June 3, 2010

Color Samples

With several types of available clay, each having different colors and textures it becomes hard to guess how each color will turn out after firing. I'm hoping to eliminate some of my "darn I wish I didn't use this color" woes by making color samples of each glaze.


I decided to go all out and make samples for every clay I use and every glaze available. I have 8 types of clay and 27 glazes so there will be a total of 216 samples in the end, which seems crazy, and maybe it is. BUT putting in the time and effort now to see the end color product will save me tons of time frustration and regret in the future. It is always a bummer after spending so much time making a piece and having the color turn out mediocre and sometimes downright terrible.


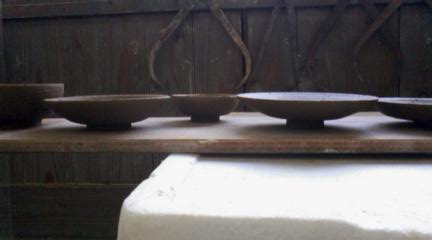
There is a certain way color samples must be made in order for the glaze to show up how it will on a piece. The most important thing is the sample has to have vertical area, aka an angle to let the glaze melt the way it would on a piece. (You can see what I mean by the pictures) The other important factor is that the sample is able to stand on its own in the kiln. Tile samples, which lie horizontal end up with different glazing characteristics than standing tiles. There are several techniques like small cups or standing slates. Since I'm making so many I chose standing slates since I can make them faster and more efficiently then small cups. They must stand on there own without toppling over, since the glaze should not touch the kiln when firing, if it does it'll get stuck to the shelf inside and may have to be chiseled off, often resulting in broken pieces.

So far I've made 3 clay set samples, only 5 more sets to go! Pictures to come after they've been glazed and fired!

On a separate note I sold 2 pieces at the Sara Yama Festival! I made 1050 yen! Not much but it's nice to have sold my first pieces, both of which I never expected to sell!

This green free form noborigama fired bowl (price 1000 yen)


and a small black noborigama fired vase (Bottom left) (price 400 yen)

Wednesday, June 2, 2010

Sara Yama Festival


May 29th and 30th was the Sara Yama Festival. A very small fair type event that had some food stalls, goods stalls, games and performances. Our pottery studio has a pottery booth every year that sells the goods the students have made and also has a paint your own plate section.


In order to sell your pieces you need to have a minimum of 5. You get 70% of the selling price you put. I have way to many pieces at home so i put 22 pieces out.

I had several small pieces ranging from 100 yen to 400 yen. Small serving plates and bowls, 2 vases, 2 small bowls and some tea cups.


These were the larger pieces...bigger plates, 2 matching plate and sauce sets. Also a large free form bowl and a spotted serving plate.


Everyone did 3 hour shifts, either morning or afternoon. This is where our pieces were being sold.


On the other side there was a free paint your own plate section. The students at Sara Yama Studio made about 300 plates for the festival. Kids and families would come and sit down for a few minutes to make their own personalized piece. It was quite busy since it was a free thing to do. Arai Sensei is firing all the plates now, they'll be ready for pick up after June 12th.

It was a fun festival! Sadly we didn't sell very many pieces, I think I only made 500 yen this time, but there's always next year!

Wednesday, May 19, 2010

Bowls, cups and plates...oh my!


I made some simple bowls and plates to add to my home use collection. I used white and red shigaraki clay for all of the pieces.

The picture on the left here has a tea cup far left with white shigaraki clay, blue lines hand painted on the side with a clear glaze over the entire piece. The two small bowls next to it are red shigaraki clay with blue and red lines with a clear
glaze. Although the same colors of blue and red with a clear glaze were used on the pieces you can see the huge difference the clay type has in the overall color and ambiance. The white clay obviously lets the color come out better, while the red clay is more subdued and earthy. This time I used a clear glaze to let the characteristics of the clay show through but the same principle applies to any color of glaze, with the exception of very dark colors like deep browns, blacks and purples. If I had used say a green glaze instead of clear on these pieces, the white clay piece would have a clear and bright color while the red clay would have a quiet green with brown undertones.


Here is an under view of the pieces. On the two bowls you can see I made two different glaze patterns. The bowl on the right has glazing all over the bowl, except the bottom rim that would touch the table surface. On the bowl on the bottom left I made the glaze line higher, so there is no glaze inside or around the bottom rim. There isn't much difference technically between making a higher or lower glaze line except letting more of the natural clay show. It's all about personal taste.


Here I have one more red shigaraki bowl like the others above, 3 small tsukemono plates and one otsumami plate.

The 3 small
tsukemono plates are from another experiment series I have just completed. These are 3 out of 14, OF firing process. They are made from red shigaraki 104 clay with modern style etchings on the top and a clear glaze. (Notice how much darker the red 104 is compared to the regular red) They are very small, about the size of a coaster. the other 11 plates were in RF firing and have different colors, but same etchings. (Those pictures will be uploaded soon)
The lined plate on the far right is a mixture of various left over clays (shigaraki mix) with a clear glaze and blue painted lines. I like this one a lot and Ill try white shigaraki clay, blue paint and a white glaze for my next experiment. I really like the traditional Japanese blue and white bowls and tea cups, but I'd like to add a modern and hand made twist to them. Heres hoping my next batch of experiments will be to my liking!

Tuesday, May 11, 2010

New pieces

Some new pieces I've made at pottery lately. Some plates and a circular vase...i'm loving the vase, cant wait to see the finished product. plates are being bisque fired, and will come out for glazing soon.