My to do list is as follows
teapot (body's been made, will make spout and top this weekend)
bunch of cups for presents, maybe 20-25 (I can hold of on this until last since they don't take long to dry)
2 large dinner plates (wheel or hand built, whichever I have time for)
Hot pot (nabe in Japanese, must be done in the next 5 days)
large bizen clay vase (I have some leeway with this one since I plan on putting it in the fall norborigama without a glaze so as long as I finish it by July 26th it will have plenty of time to dry but it'll take 20-25 hours to build so I still have to hussle)
small hand built hors d'œuvre plates (I hope to use all my left over bits of clay and make a mix, these should be done in the next 3 weeks)
chopstick holders and napkin rings (20-25, good for presents)
Rushing is somewhat ruining my creativity at this point, since I'm trying to get so much done in a short time I cannot think too much about making a cool design or nitpicking on making it exactly how I want. But I think it'll be fine in the end, sometimes thinking too much about design or nitpicking about shape is a waste of time.
Anyways here's what I've been up to lately...
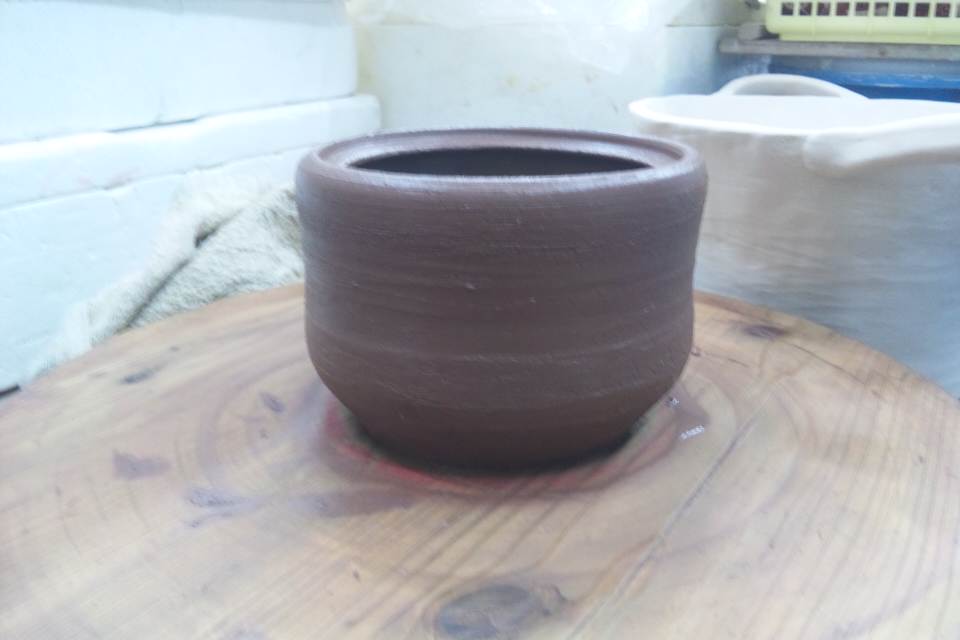 Like I mentioned above I made a teapot body. This is a special clay that can be put over fire for cooking. It's called nabe nendou in Japanese. It's very sandy and a maroon purple color. This is the most challenging clay I've had to work with since starting ceramics. It's easy to center which is great, but if you don't make your piece quickly the sediment starts to melt away...Since I'm no professional it took me about 30 mins to get this shape after one fail. The longer I took the softer the clay got and the harder it was to form the clay.
 I was originally going for a more round shaped body but since the clay got so soft it would sink down (the first fail) so Arai Sensei brought it back to a bowl shape and I decided to make it have a large lid instead. Making the lid resting spot is the hardest part. You can see in this picture what it looks like afterward. The whole process is basically bringing the rim down inside the body while using your middle finger to support the underside. I've done it a few times and have gotten slightly better but it's still a challenge.
In the meantime this will await carving as I make the lid and spout.
I've been working on a smaller rectangle shape vase for the past few days as well. I used red stone clay and plan on using B glaze
 First I drew a sketch of what I wanted, figured out height and width, rolled the clay out to 5mm thick and cut the pieces out to fit my measurements. I placed the pieces between drywall to help absorb the moisture, but it wasn't enough to make them rigid enough for building that day.
 So I put them in plastic sheeting and into a styrofoam box for a few days so they would harden up.
 After about four days they were perfect for building. It was time to start putting all my cut pieces together. Here is the base part with 3 walls attached.
As with all attachment projects you need liquid clay and scoring to ensure a good bond. To add to the strength I also smooth soft clay over the bonded areas to make it extra strong.
 Fourth wall is put up.
For my design I wanted a multi rectangle layered vase, which is a challenge since clay tends to sink when put horizontally, and even more so when you put weight on top of it. So after consulting with Arai Sensei he advised me to make clay beams in the inside to support the weight and prevent sinkage.
 Here is a drawing of what I did. The top is the lid that will go on top of the vase, The blue is the next rectangle outline that will fit on top. (See drawing below, the black colored part has yet to be put on)
The rectangle below is an aerial view of the base. The red lines are the beams I added on the inside for support. I placed them at the most vulnerable spots, and once the top was put on you could not see them.
 I was so absorbed in the project I forgot to take pictures of the beams, but here is the after picture. It turned out very well and hopefully won't sink.
Originally I was only going to do a two story vase but I decided to add one more small rectangle at the top.
 Here's a pic of the last small rectangle being assembled. Notice the scoring and liquid clay to ensure a strong bond. (I also added beams below this one)
 And voila! Done! I really love the shape and can't wait to see the final product. Next time I'll smooth out the rough edges and do the final quality control check.
Making this vase I learned how important it is to measure accurately and keep back up pieces in case I cut incorrectly. Planning in key for something calculated like this.
It's hip to be a square!...emmm rectangle :)
Until next time!!!
No comments:
Post a Comment